
Getting Started
Before you can use this service with Alexa or Google Home you need to:
- Create an account via https://red.cb-net.co.uk/new-user.
- Verify your account, using the email sent following account creation
- Link your Amazon and/ or Google account with the Node-RED Smart Home Control API
- Define one or more devices.
- Install required Node-RED Nodes
- Setup Node-RED flows using your devices.
You may also need to consider whether deploying a local MQTT service is required (to act as a hub for your devices), if so follow the instructions under Install Local MQTT Service to get up and running.
A Raspberry Pi is the ideal “work horse” for both Node-RED and MQTT server workloads (within reason!).
Tip
If you get stuck, don’t forget to review the troubleshooting section.
Note
Looking to migrate from another service? See Migrating from Another Service
Account Linking
Link your Amazon Account
Note
There are Alexa restrictions based on region/ locale, Amazon publish and update their region-specific restrictions here.
To link your Amazon account:
- Open Alexa App on your mobile device
- Browse to “Skills and Games”
- Search for “Node-RED Smart Home Control”
- Link your account!
Link your Google Account
Warning
If your locale is not English you currently have to request extension of the service to your Google account. Please contact node-red@cb-net.co.uk for access. Once granted access you may need to browse to https://console.actions.google.com/u/0/project/node-red-208520/simulatorcreate?isDeepLink to accept Google Terms and Conditions to use the service.
To link your Google account:
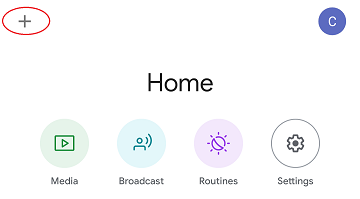
- Open the Google Home App
- Hit the ‘+’ icon in the top left of the App
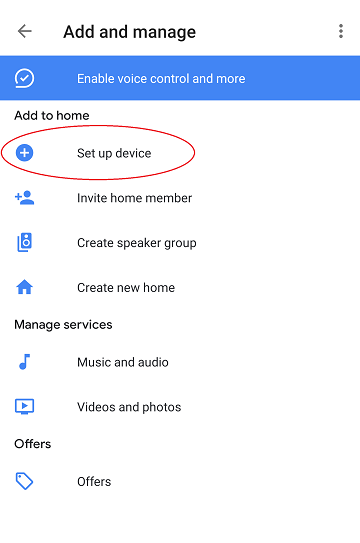
- Go to “Set up device”
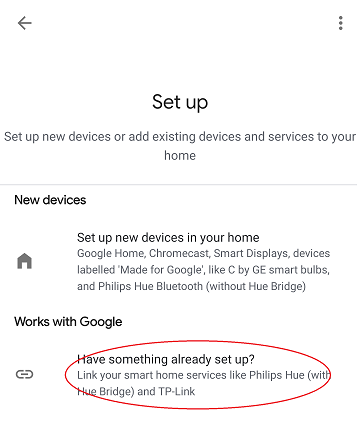
- Under “Works with Google” hit “Have something already setup?”
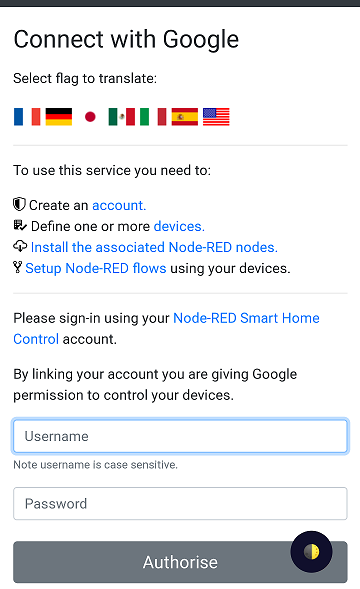
- For English locale users select “Node-RED Smart Home Control” otherwise, for non-English locale users, select “[test] Node-RED Smart Home Control” and complete the account linking process
Note
Not all device types and traits are supported by Google Home, the device creation wizard highlights which capabilities/ traits are supported. To remove the need to define Google or Alexa-specific devices the API itself will automatically only expose a devices’ supported capabilities or “traits” to Google Home. You can see a comparison between the two services here.
Install Local MQTT Service
Tip
If you’re looking to use MQTT-connected devices, running firmware such as Tasmota, you’re going to need a local MQTT service to act as a “hub.” The instructions below outline how to install Mosquitto and configure it to act as an internal bridge for your devices. You must ensure that the MQTT server you deploy is accessible from the network where your IoT/ MQTT enabled devices reside.
Warning
If you’re only using HTTP-controlled, or other non-MQTT devices then you can skip this step.
First, install Docker CE using the commands/ process outlined here. If you’re using a Raspberry Pi you can follow these instructions to get up and running.
Now prepare configuration/ persistent storage for Mosquitto container:
sudo mkdir -p /var/docker/mosquitto/config/conf.d
sudo mkdir -p /var/docker/mosquitto/data
sudo mkdir -p /var/docker/mosquitto/log
Create the required configuration file:
sudo vi /var/docker/mosquitto/config/mosquitto.conf
File contents should be as below:
pid_file /var/run/mosquitto.pid

# Configure ports
port 1883

# Block anonymous access
allow_anonymous false

# Configure persistence for retained messages
persistence true
persistence_location /mosquitto/data/

# Configure Logging
log_timestamp_format %Y-%m-%dT%H:%M:%S
log_dest file /mosquitto/log/mosquitto.log
log_dest stdout
log_type all

# Configure file-based access
password_file /mosquitto/config/pwfile

# Add /mosquitto/config/conf.d to includes
include_dir /mosquitto/config/conf.d
Ensure Mosquitto related file/ directory ownership is correct and create the Docker container:
sudo chown -R 1883:1883 /var/docker/mosquitto/config
sudo chown -R 1883:1883 /var/docker/mosquitto/data
sudo chown -R 1883:1883 /var/docker/mosquitto/log

sudo docker create --name mosquitto \
-p 1883:1883 \
-v /var/docker/mosquitto/config:/mosquitto/config \
-v /var/docker/mosquitto/data:/mosquitto/data \
-v /var/docker/mosquitto/log:/mosquitto/log \
--restart=always \
--log-opt max-size=10m \
--log-opt max-file=5 \
eclipse-mosquitto
Start the Mosquitto MQTT server:
sudo docker start mosquitto
Now create users, on a per-device basis (that way if any single device is compromised the impact will be minimised):
sudo docker exec -it mosquitto_passwd -b /mosquitto/config/pwfile 'username' 'password '
Tip
If you are using Tasmota, the usernames and passwords you define in the step above will be what you enter in the device MQTT configuration, as outlined here: https://github.com/arendst/Tasmota/wiki/MQTT
Install Node-RED
If you don’t already have Node-RED running in your environment I’d highly recommend using the Docker images available here: https://hub.docker.com/r/nodered/node-red
Install Docker CE using the commands/ process outlined here. If you’re using a Raspberry Pi you can follow these instructions to get up and running.
Create the Node-RED Docker container using the following commands:
# Create Docker volume to enable persistent data/ config
sudo docker volume create nodered-data

# Create Node-RED Docker container
sudo docker create \
-p 1880:1880
--name="nodered" \
-v nodered-data:/data \
-e TZ=Europe/London \
--restart=always \
--log-opt max-size=10m \
--log-opt max-file=5 \
nodered/node-red
Start Node-RED:
sudo docker start nodered
You now have Node-RED running in your environment, browse to http://<hostname_or_IP>:1880 in order to install Nodes and configure your flows.
Install Node-RED Nodes
Install the Node-RED Nodes by either:
- Using the palette look for node-red-contrib-alexa-smart-home

- Using the command: npm i node-red-contrib-alexa-smart-home
Node-RED Configuration
Warning
You must verify your account (via email sent on account creation) in order for the Node-RED nodes to connect.
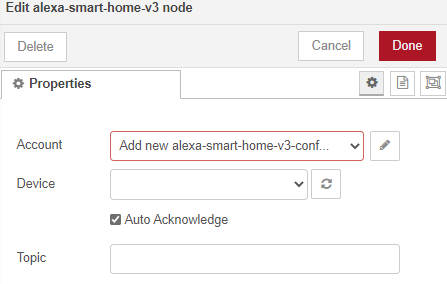
Once Node-RED nodes are installed you’ll need to configure your account settings, drag a new “alexa-smart-home-v3” node onto the canvas and double click it.
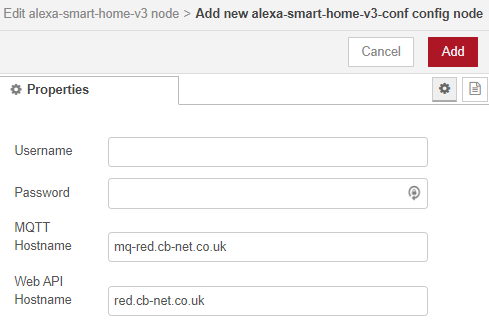
Click the edit button to define a new account:
Enter your Node-RED Smart Home Control username and password and click ‘Add’ to save the account details.
You can now start to build flows using the concept and example flows in this documentation for inspiration.
Tip
Unless you are hosting your own instance of the API, you can leave the default “MQTT Hostname” and “Web API Hostname” fields as-is.
Warning
You only need to define your account configuration once, re-use this configuration across all of your flow.
Concept Flows
Start Simple
If you are planning to use voice control only, and you are not concerned about state visibility in the Alexa/ Google Home Apps, you only need:
- An “alexa-smart-home-v3” node (set to Auto Acknowledge)
- A receiving node for commands, such as MQTT out/ publishing that enables you to interact with the device itself

Note
Any device you chose to use this simple flow with must be configured with “Report State” disabled. See Add State if you want to benefit from state information in your Smart Assistant application(s).
You may also require a standard Node-RED function node (with your own code) to “format” command output appropriately for your chosen endpoint - examples include HTTP request, MQTT out, Yamaha AVR nodes that will likely require a specific msg format.
This basic flow is a great starting point for first-time users. You can then progress to extend the flow to enable state updates, out-of-band state updates or to perform other functions as outlined in later examples.
Warning
You should only include a single “alexa-smart-home-v3” and single “alexa-smart-home-v3-state” node per device.
Add State
Tip
Not all capabilities support state, see here.
Now you have basic voice commands working, let’s add state updates to your flow.
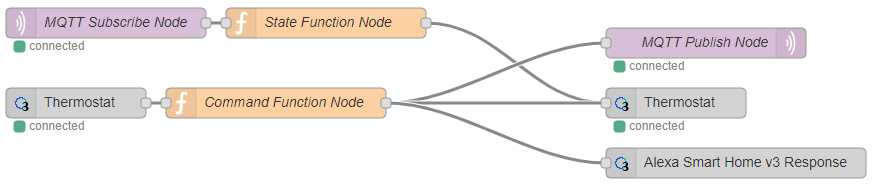
If you only plan on interacting with the device using the Alexa or Google Home app, or voice assistants you can simply take state from the “alexa-smart-home-v3” node and feed it straight into the “alexa-smart-home-v3-state” node.

If, however, you will physically interact with the device, or it has a timer function or there are any other means for you to change its state, you will need to ensure you are sending “out of band” state updates (where the changes in state have not come from activity within the service itself) to the Node-RED Smart Home Control service.

In the example above you can see a function node that has been created to intercept MQTT messages for the device and “translate” them to the required format to send back to Node-RED Smart Home Control. Example function code, for a wi-fi light switch running Tasmota firmware is shown below:
var tokens = msg.topic.split("/");
var device = tokens[1];
var element = tokens[2]
var state = msg.payload;

// MQTT POWER State
if (element == 'POWER') {
    return { "payload" : { "state" : { "power" : state } }, "acknowledge" : true };
}
Warning
When both an “alexa-smart-home-v3” and “alexa-smart-home-v3-state” node are used in a flow you must ensure that these nodes are configured for the same device.
Auto Acknowledge
By default, when you add an “alexa-smart-home-v3” node to a flow it is configured for “Auto Acknowledge,” this means that a response is sent back to Node-RED Smart Home Control confirming that the command has been received, and it is assumed that the command was successful. This may not be desirable, depending upon the criticality of the command you have issued.
It is possible to disable “Auto Acknowledge” and use your own logic to establish whether the command was successful, before setting msg.acknowledge to true or false and sending the message to a alexa-smart-home-v3-resp node. Note that you must send the original message, as output from the “alexa-smart-home-v3” node, modified to include msg.acknowledge.
Warning
This is the most advanced flow type, the majority of scenarios do not warrant/ require this level of complexity - it’s just available should you want it!
Migrating from Another Service
The Node-RED nodes from other services such as https://alexa-node-red.bm.hardill.me.uk/ service and this API can co-exist, but your existing flows will need to be modified if you want them to use the “v3” service/ devices.
You are able to test new flows, using the the nodes associated with this API alongside another service, prior to moving your devices.
A typical migration path would look like:
- Follow initial setup instructions, as-per Getting Started
- Redefine your devices via https://red.cb-net.co.uk/devices - you’ll need different names if co-existing with another service
- Review Default Node Outputs - namely response nodes change to msg.acknowledge from msg.payload plus the addition on State nodes with the required function nodes to handle input from outside of the pre-defined nodes
- Replace legacy/ V2 Nodes with nodes associated with new nodes, removing devices from the v2 service and the Alexa App
Note
These services do not share any data, therefore you must create a new account on the v3 service/ define your devices.